On this page
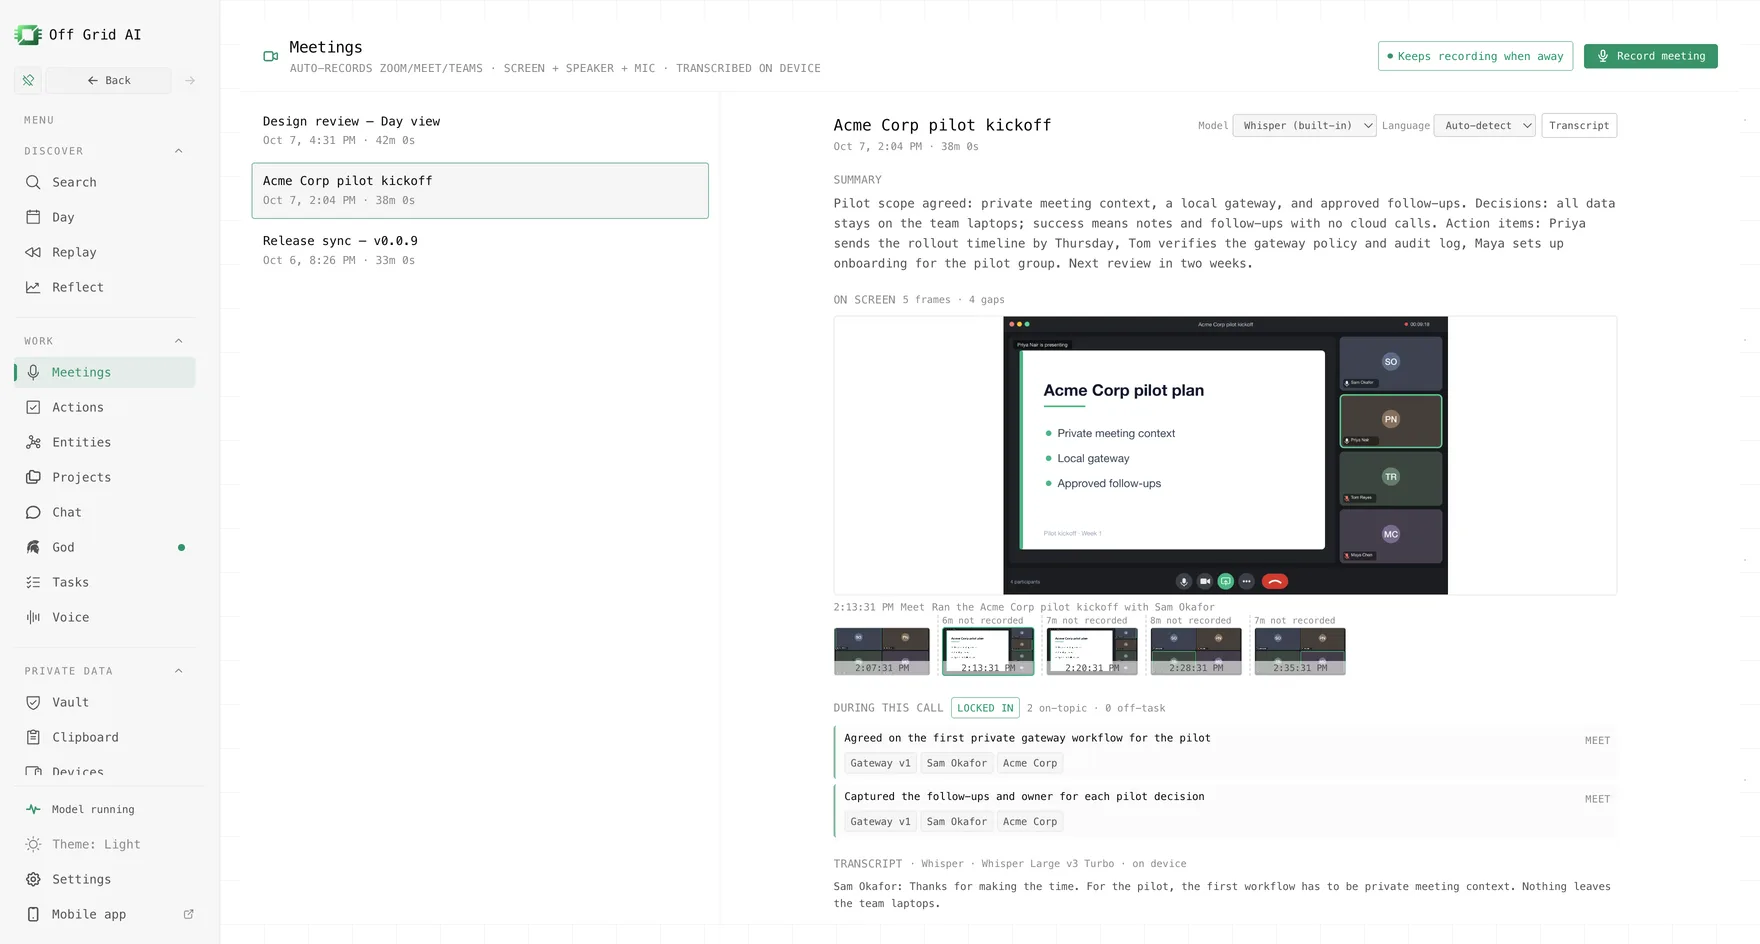
A transcript can tell you what was said, but not always which screen was visible. OGAD (Off Grid AI Desktop) Pro beta 114 adds an On screen timeline to meeting details on Windows. Review saved screen images beside the meeting record to recover the visual context of a discussion.
| Download OGAD | Get beta 114 |
What would you like to do with Off Grid AI?
Have a feature or use case you would like us to support? Tell us what you want to do and which device you use.
Write to support@offgridmobileai.co, join our Slack community, or talk to us on Reddit.
What does the timeline contain?
The timeline displays captured screen images associated with the meeting, with timestamps and gap markers. It is useful when you need to identify the slide, document, or page visible during a question.
It is sampled screen history, not a promise of continuous video or a frame for every spoken sentence. A gap is missing visual context. Do not fill that gap with an assumption just because the transcript mentions a slide.
Prepare a short visual sample
Use the x64 Windows beta with Pro active. Allow microphone access and check the recorder’s system-audio path. Review Settings > Setup & health for a reported setup problem.
Prepare a local speech model for transcription and a local text model for the recap. Start a short agreed recording from Meetings, using Record meeting when needed. Check the visible recording state before showing material you want retained.
Display two harmless pages or slides with different headings. Discuss each briefly. Stop the recording and let processing finish. This gives you a simple way to check whether the saved images match the material shown.
Participants should know that the recording can include screen content. Choose the source carefully. A whole-screen source can contain other visible windows; a meeting record is not a reason to retain unrelated private material.
Review the visual record
- Open Meetings and select the saved sample.
- Find On screen in the meeting detail.
- Select a timeline thumbnail and inspect the larger image.
- Read its timestamp and any gap marker beside it.
- Compare the visible heading with the related discussion in Transcript.
- Check the original document before copying an exact figure or statement into your notes.
The expected result is a visual cue you can trace back to the conversation. If the transcript says “the second option” and the captured page shows the option names, you have something concrete to check. If the timeline does not show the relevant page, retain the ambiguity.
During a live recording, Live returns the timeline to its live position after you inspect an earlier moment. It does not restore a missing frame or make capture continuous.
Use the image to make a better meeting note
Suppose a team discussed a price table on screen. The transcript contains “use the lower amount,” but does not name the row. Find the nearby captured image and identify the visible rows. Then check the spoken passage and the original table before recording the decision.
Write a note that keeps the evidence clear:
The discussion referred to the support-plan table. Check the row shown at this timestamp before confirming the selected amount.
If the source confirms the row, replace the open question with the checked decision. Do not ask an AI summary to guess which visible item someone meant.
This also helps with product demos. A question may make more sense when you see the screen being shown. Use the saved image to find the original section, then keep its link with the checked answer.
What if no images appear?
An empty timeline can mean no associated frames were captured, the source did not provide them, or capture was interrupted. Check the recorded source and permission state before starting another meeting. A transcript can exist even when visual history is incomplete.
Gap markers help you see that the record is partial. Source selection, system load, and capture failures can affect the sequence. Use the recording and original material when the sampled images do not settle a question.
Keep the source and summary separate
A screen image is evidence of what was visible. It does not prove that a participant read, approved, or sent that content. A generated description is another processing result and can be wrong.
Use local models for local note processing. Downloads need internet initially, and the call service retains its normal connection. Protect saved meeting media and any exports you share later.
This guide covers OGAD beta 0.0.55-beta.114. The release and build record identify the desktop version and its included Pro code. Setup details follow that code; they are not a device test.
Get beta 114 and record a short two-slide sample. Check On screen before relying on visual context from a full meeting.